| The unoffical Warhammer Home Page
Greg's Warhammer Picture Page with different artworks of great artists
How To Paint Warhammer figures
Favorite Links Page
|
|
|
WHAT EQUIPMENT DO YOU NEED?
You don't need much equipment for painting - a good selection of paints, some inks, and a number of good quality brushes are the most important things.
PAINT: Games Workshop's range of Citadel water-soluble acrylics has been specially formulated for painting metal and plastic miniatures. There are over 50 different colours to choose from, available in single pots or boxed sets.
INK: Citadel produce a range of inks that complement our paints, and are designed to be used in conjunction with them.
BRUSHES: Brushes are come in a variety of sizes, from tiny fine detail brushes to large brushes for painting vehicles and scenery. You will need a selection of good quality brushes such as or own Citadel brushes, which are made from fine quality sable.
UNDERCOAT: Before models are painted, they need to be undercoated. Games Workshop sells spray paint in a number of suitable colours such as white, black, green etc.
|
 Something like this would be great.
|
|
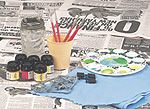
SETTING UP A PAINTING & MODELLING AREA
THE TABLE. For painting and modelling you will need a steady table, positioned somewhere where the lighting is good, like next to a window. Unless it's a very old, unwanted table, it's best to cover it with a thick layer of newspaper to protect the surface from scratches and water spills. If you are doing any modelling, you'll need a cutting mat as well.
LIGHTING. Natural daylight is best for painting, as artificial light distorts the colours. To get round this problem, many painters fit a daylight bulb into a standard lamp. Daylight bulbs cast a light that is similar to real sunlight, which makes it better for painting by.
STORING YOUR EQUIPMENT. It's a lot more convenient if you can keep your tools and equipment on or near the table where you work. If this isn't possible, you'll need a box or some sort of portable container to store your stuff in. Alternatively, Games Workshop sells a sturdy paint station which you can use for storage and as a working area.
|
|
PAINTING SKAVEN An example to help new people to Warhammer
What you will need:
Assembled Skaven model
Brushes
Citadel Colour paints: Bestial Brown, Dwarf Flesh, Skull White, Chaos Black, Boltgun Metal, Bubonic Brown, Brown ink, Snakebite Leather, Camo Green, Dwarf Bronze.
Citadel Spray paint Bestial Brown Undercoat and Varnish
Modelling flock
Static grass
PVA glue
Ofiical gamesworkshop site if you need any more help
STAGE 2: THE CLOTHES, POUCHES, BAGS ETC
As with the other stages, the first step is to paint the base colour. Use black for armour, otherwise use the darkest shade of whatever colour you want the clothes to be. For Skaven you can use mostly Snakebite Leather, Bubonic Brown and Camo Green. This was highlighted by mixing with white and produced a dull, faded look. The armour was painted with a mix of Chaos Black, Boltgun Metal and Dwarf Bronze. This gave a very dark and slightly rusty look to the metal. Paint the pouches with a base of Snakebite Leather washed with Brown Wash and then highlighted with Snakebite Leather and finally a Snakebite Leather and Skull White mix.
Back to home page
|
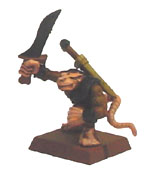 STAGE 1: THE SKIN, FUR AND WEAPONS
The Skaven was undercoated in Bestial Brown to provide a base coat and colour for the deepest parts of the skin. First paint a mix of Bestial Brown and Dwarf Flesh on the face, hands, feet and tail over the base coat, leaving the areas dark. Highlights are built up by adding more Dwarf Flesh to the mix and again painting the areas you want lighter. Keep adding more Dwarf Flesh to the mix until you are satisfied with the end result. A final highlight of Dwarf Flesh and Skull White mix can be used for the lightest areas such as knuckles, eyebrows and around the mouth.
STAGE 1: THE SKIN, FUR AND WEAPONS
The Skaven was undercoated in Bestial Brown to provide a base coat and colour for the deepest parts of the skin. First paint a mix of Bestial Brown and Dwarf Flesh on the face, hands, feet and tail over the base coat, leaving the areas dark. Highlights are built up by adding more Dwarf Flesh to the mix and again painting the areas you want lighter. Keep adding more Dwarf Flesh to the mix until you are satisfied with the end result. A final highlight of Dwarf Flesh and Skull White mix can be used for the lightest areas such as knuckles, eyebrows and around the mouth.
Handy tip: Make the highlight mixes thin by adding a small amount of water. When you paint this onto the model, the base colour will show through, making the colour on the model lighter than the base coat but darker than the mix. The more layers you paint, the less the base coat shows through and the lighter the highlight becomes. This allows you to blend in a light highlight without constantly mixing up an ever-so-slightly lighter mix of paints (it makes sense to me!).
Give the fur a Brown ink to darken the colour and pick out the detail of the fur. Next drybrush the fur with Bestial Brown and for final highlights drybrush again but add just a smidgen of white. Easy!
Any metal parts are always given a Chaos Black base coat, then painted with the same mix of colours I use for the armour. The edges are highlighted with Boltgun Metal. Wooden handles, sword scabbards, spears, etc. are painted in Bubonic Brown and washed with Brown Wash. For the highlight, just drybrush with Bubonic Brown.
Handy tip: When painting fur, hair or other areas with lots of deep sculpting, washes are great for covering up those little spots which you can't seem to get the paint into.
|

STAGE 3: FINAL DETAILS & THE BASE
These include eyes, teeth, nails, whiskers and the muddy effect on the clothes. Paint the eyes black first, then paint over with white, leaving the black just at the edges. The white is then painted over with a bright green to give a glowing warpstone look.
Teeth and nails are first painted black, then picked out with Bleached Bone. The whiskers are just small dots of Brown Wash. The muddy effect was achieved by painting the base of the clothes with Flesh Wash, then again, lower down the clothes, with Brown Wash.
Shields are painted separately and fixed to the model when finished. The base coat is Bestial Brown washed with Brown Wash. The highlights are applied by drybrushing, first with Snakebite Leather, then with a Snakebite Leather and Skull White mix.
The base of a figure can have a dramatic effect on the final look and so needs a little thought. To keep in the theme of my Skaven, brown is often the best colour. The small patches of static grass are just enough to help the army blend in when fielded on a green gaming table (which is most of the time).
|
|
|


